


A part of my journey has come to a close. I left something behind with sadness and gratitude for all the wonderful moments, and I am embarking on a new stretch. I am excited about it and a little scared, but it's okay... All new beginnings are a bit of both. There is a beauty in it. New journeys make us who we are.
While I am waiting for this new phase to commence, I’ve been doing absolutely nothing. I thought that doing nothing would last only a couple of days, but it turns out, doing nothing is awesome. In between the bouts of nothing, I bake. I could have gone to Paris (sorry Kiki), Vienna (sorry Alex), California (sorry Priki), or so many other places where friends await (sorry friends), but these days I am finding that baking is better than traveling far and wide. Baking IS traveling far and wide; it’s a journey. A journey into the senses, into the feelings of getting your hands dirty, being present in the moment, being grounded, and being excited about the outcome when you prop open the oven door. The joy when the hot, perfumed steam hits your face and you know that you've done it.
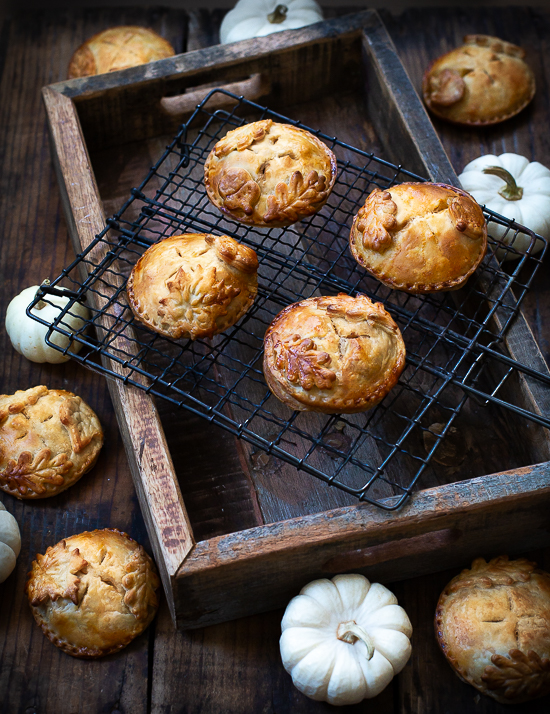
Which brings me to these pies. They were a new journey too. I have not made them before, but I had a pretty good idea how they were supposed to look and taste, so I’ve been practicing. Baking a pie is not an easy feat. So many things can go downhill, and baking hand pies is even more difficult -- you are handling not just one beast, but a dozen of little temperamental ones. To pull it all off, you need a rock-solid recipe, a couple of tricks up your sleeve, and a robust workflow. So let’s cover it all briefly:
recipe: When making hand pies with lots of chunky filling, you don’t want dough that is too tender or too soft. Otherwise, the pie will fall apart when you pick it up. As a result, the traditional, butter-rich pie dough recipe we all swear by does not quite work here. You want to cut on the fat and improve the sturdiness of the dough. I’ve been searching for an awesome recipe for hand pie dough for a while and the cream cheese dough from Baking Sense has proven indispensable. Cream cheese makes for sturdier pies, adds wonderful flavor to the crust, and produces beautiful rich color despite a short time in the oven. This recipe also uses all-purpose flour instead of pastry to achieve dough structure that can stand up to the rolling, cutting, shaping, and decorating of individual pies. The only tweak I made to the original recipe is adding a pinch of baking powder and a drop of vinegar. More on that below.
backing powder: It’s something I learned from Rose Levy Beranbaum’s iconic Pie and Pastry Bible and her recipes online. Adding a tiny amount of baking powder to pie dough is like adding magic dust. It helps with flakiness, makes the dough airier, prevents crust from shrinking while baking, and adds a lift to achieve an impressive pie dome.
vinegar: Vinegar or not? It’s been a million-dollar question. Theory states that gluten formation is inhibited in acidic environments, so adding vinegar or lemon juice to pie crust will keep it more tender. Right? Hmm... Kenji argues that gluten formation is actually improved in mildly acidic environments, and adding a small amount of acid to a pie crust will make it sturdier, not more tender. Which works against super tender pies, but it works for us in this endeavor. (To complete the thought, to get any real tenderizing effect, you'd need to add far more acid than a crust can handle, giving it a very sour off-flavor and making it too wet to work with.) One more thing acting in favor of vinegar in this recipe is that it helps prevent dough from oxidizing, which is important if you will be moving the dough and the finished product in and out the fridge for a while, which we will. (You can read more about the oxidation effect on King Arthur’s blog here).
workflow: With hand pies, a good recipe is only a part of the story. The other part is how you organize your work. There are many things to pay attention to (like having your ingredients cold, not overworking the dough, letting it rest, chilling the pies, baking from cold) and many tasks to complete (make the dough, make the filling, roll the dough, assemble the pies, rest, slash and decorate, rest, bake), so it helps to make a schedule ahead of time. Not everyone does things the same way, but whatever you do, try putting it down on a piece of paper before you start. It will keep you organized and help avoid unnecessary mistakes. My baking schedule looks like this:
That’s pretty much it. I have another week of doing nothing, and perhaps baking more pies. There are a couple of more awesome savory fillings I want to try, like sausage, jalapenos, and charred corn (Dr. V asked for it), sauerkraut with white wine and herbs (because it’s October), and squash with grilled onions and Taleggio (this one is for me and I cannot stop thinking about it). Will report back on Instagram so stay tuned.
Savory Hand Pies with Pumpkin, Beef, Raisins, Herbs, and Red Wine
While I am waiting for this new phase to commence, I’ve been doing absolutely nothing. I thought that doing nothing would last only a couple of days, but it turns out, doing nothing is awesome. In between the bouts of nothing, I bake. I could have gone to Paris (sorry Kiki), Vienna (sorry Alex), California (sorry Priki), or so many other places where friends await (sorry friends), but these days I am finding that baking is better than traveling far and wide. Baking IS traveling far and wide; it’s a journey. A journey into the senses, into the feelings of getting your hands dirty, being present in the moment, being grounded, and being excited about the outcome when you prop open the oven door. The joy when the hot, perfumed steam hits your face and you know that you've done it.
Which brings me to these pies. They were a new journey too. I have not made them before, but I had a pretty good idea how they were supposed to look and taste, so I’ve been practicing. Baking a pie is not an easy feat. So many things can go downhill, and baking hand pies is even more difficult -- you are handling not just one beast, but a dozen of little temperamental ones. To pull it all off, you need a rock-solid recipe, a couple of tricks up your sleeve, and a robust workflow. So let’s cover it all briefly:
recipe: When making hand pies with lots of chunky filling, you don’t want dough that is too tender or too soft. Otherwise, the pie will fall apart when you pick it up. As a result, the traditional, butter-rich pie dough recipe we all swear by does not quite work here. You want to cut on the fat and improve the sturdiness of the dough. I’ve been searching for an awesome recipe for hand pie dough for a while and the cream cheese dough from Baking Sense has proven indispensable. Cream cheese makes for sturdier pies, adds wonderful flavor to the crust, and produces beautiful rich color despite a short time in the oven. This recipe also uses all-purpose flour instead of pastry to achieve dough structure that can stand up to the rolling, cutting, shaping, and decorating of individual pies. The only tweak I made to the original recipe is adding a pinch of baking powder and a drop of vinegar. More on that below.
backing powder: It’s something I learned from Rose Levy Beranbaum’s iconic Pie and Pastry Bible and her recipes online. Adding a tiny amount of baking powder to pie dough is like adding magic dust. It helps with flakiness, makes the dough airier, prevents crust from shrinking while baking, and adds a lift to achieve an impressive pie dome.
vinegar: Vinegar or not? It’s been a million-dollar question. Theory states that gluten formation is inhibited in acidic environments, so adding vinegar or lemon juice to pie crust will keep it more tender. Right? Hmm... Kenji argues that gluten formation is actually improved in mildly acidic environments, and adding a small amount of acid to a pie crust will make it sturdier, not more tender. Which works against super tender pies, but it works for us in this endeavor. (To complete the thought, to get any real tenderizing effect, you'd need to add far more acid than a crust can handle, giving it a very sour off-flavor and making it too wet to work with.) One more thing acting in favor of vinegar in this recipe is that it helps prevent dough from oxidizing, which is important if you will be moving the dough and the finished product in and out the fridge for a while, which we will. (You can read more about the oxidation effect on King Arthur’s blog here).
workflow: With hand pies, a good recipe is only a part of the story. The other part is how you organize your work. There are many things to pay attention to (like having your ingredients cold, not overworking the dough, letting it rest, chilling the pies, baking from cold) and many tasks to complete (make the dough, make the filling, roll the dough, assemble the pies, rest, slash and decorate, rest, bake), so it helps to make a schedule ahead of time. Not everyone does things the same way, but whatever you do, try putting it down on a piece of paper before you start. It will keep you organized and help avoid unnecessary mistakes. My baking schedule looks like this:
Day 1: Make the dough. Bake the pumpkin. Make the meat filling. Rest everything overnight.
None of the steps above are overly timely or difficult, but together, things add up. I like to assemble and decorate pies when I am rested, focused, and excited about it. Sort of like decorating the Christmas tree. No one decorates the tree straight from the market, right? It’s a delicate, joyful work, and I try to avoid doing it after a series of mundane kitchen tasks.
Day 2: Assemble the pies. Rest and decorate. Freeze overnight (or longer).
Once the pies are assembled, it's good to give them a nice rest in the freezer. It helps retain the shape when baking and have the decorations sharp. You can bake the pies after they've rested in the freezer for about an hour or two, but I enjoy them better the following day when my nose and palate are less overwhelmed from a day in the kitchen. (I often make the pies in advance and keep in the freezer when we have guests. They freeze beautifully.)
Day 3 (or near future): Bake. Serve.
Nothing else to be said. Enjoy!
That’s pretty much it. I have another week of doing nothing, and perhaps baking more pies. There are a couple of more awesome savory fillings I want to try, like sausage, jalapenos, and charred corn (Dr. V asked for it), sauerkraut with white wine and herbs (because it’s October), and squash with grilled onions and Taleggio (this one is for me and I cannot stop thinking about it). Will report back on Instagram so stay tuned.

for the dough:
13 3/4 oz all-purpose flour
1 tablespoon granulated sugar
1 teaspoon kosher salt
1/8 teaspoon baking powder
4 oz cream cheese, cold and cut into 1" cubes
4 oz unsalted butter, frozen and cut into 1/4" dice
4 oz (1/2 cup) iced water
1 1/2 teaspoons cider vinegar
for the filling:
one small butternut squash or sugar pie squash, cut into ½-inch dice
4 tablespoons olive oil, divided (2 tablespoons + 2 tablespoons)
1 pound ground beef
one small onion, 5-6 ounces, cut into fine dice
2 tablespoon raisins
1 tablespoon dried oregano
1 tablespoon fresh summer savory, marjoram, or thyme, minced
1/4 teaspoon ground clovers
1/4 teaspoon ground cinnamon
1/4 teaspoon ground nutmeg
1 - 2 tablespoona tomato concentrate or ketchup
1/3 cup red wine
salt and freshly ground pepper
to finish:
1 egg
2 teaspoons of milk
hardware:
4”, 5”, or 6” cookie cutter or cookie cutter and sealer
To make the dough:
Prepare a cup of water and add a couple of ice cubes. Set aside.
In a bowl, combine the flour, granulated sugar, salt, and baking flour. Whisk to combine.
Add the cream cheese cubes. Using your fingers, mix the cream cheese into the flour until it resembles coarse cornmeal.
Add the butter to the mixture. Using your fingers work it in, until none of the butter is larger than a small pea. Work quickly so that the butter doesn’t warm up.
Measure out 1/2 cup of water. Add the vinegar to the water. Add the liquid to the flour mixture at once and toss to combine. Gently work the dough just until it comes together. Form the dough into a ball or a disk, wrap and refrigerate for at least 2 hours, ideally overnight.
To make the filling:
Preheat the oven to 400°F regular bake (375°F convection).
Drizzle the squash cubes with 2 tablespoons of oil. Season generously with salt and pepper. Brush a baking sheet with oil and place the squash cubes on it in one layer. Bake for about 30 minutes, or until the cubes are roasted and gently charred, but not completely falling apart. Set aside.
In a large sauté pan, warm up 2 tablespoons of oil. Add the onion and sauté for a couple of minutes until the onions soften and become translucent. Add the meat and break it with spatula. Cook for about 5 minutes, until the meat is cooked through. Add the raisins, oregano, fresh herbs, cloves, cinnamon, nutmeg, tomato paste, and red wine. Reduce heat to medium low, and simmer until the liquid is almost absorbed. Season with salt and pepper. Set aside.
If you are making the filling a day ahead, store the squash and the meat separately in the refrigerator. When ready to assemble pies, bring both to room temperature, add the squash cubes to the filling, and gently fold in. Make sure that the filling is cold or at least at room temperature when making the pies.
To assemble and decorate hand pies:
Prepare the egg wash. Beat the egg with two tablespoons of milk. Set aside.
Line a large tray with wax or parchment paper. Set aside.
Roll out the dough to 1/8” thick. If you do not have large work surface, you may want to split it in half, and do this in batches.
Use the cookie cutter to cut out the rounds. Place the rounds on the tray. Place the tray in the fridge for about 15 minutes before adding the filling.
Gather the leftover dough. Chill for about 10 minutes, it will make rolling and cutting easier. Roll out to 1/8” and use cookie cutters to cut out desired shapes. Place the decorations on a small tray lined with wax or parchment paper and refrigerate for at least 10 minutes.
To assemble the pie, take two rounds. Add the filling to the center of the first round. Make it generous so that there is a little dome, but do not spread the filling all the way to the edges to prevent leakage. I usually use 2 to 3 tablespoons of the filling for 5” hand pies. Brush the edge of the round with the egg wash. Place the second round on top. If you are using a cut and seal cutter, press down on the pies to seal the edges (you can skip the egg was as the press will seal the edges firmly.) If you are using a regular cookie cutter, crimp the edges of the hand pies with a fork to seal them. Place the pies in the fridge for about 20 minutes before decorating.
Cut three or four slits on top of each pie. This will help steam escape while baking.
Brush each pie with egg wash. Decorate the pies with the cut outs. Brush the decorations with the egg wash.
Place the assembled pies in the freezer for at least 30 minutes before baking. This will help the decorations and the pies hold their shape. I usually freeze overnight and serve the following day. (If you are planning on keeping the pies in the freezer for later use, once they are fully frozen, put them into a freezer bag and close tightly until ready to bake. They will keep in the freezer up to 3 months.)
To bake:
Preheat the oven to 400°F regular bake (375°F convection).
Place the pies on a baking tray lined with parchment paper. Bake for 25 to 30 minutes (for 5" pies, less for smaller), until deeply golden. Let cool slightly before serving.
Preheat the oven to 400°F regular bake (375°F convection).
Place the pies on a baking tray lined with parchment paper. Bake for 25 to 30 minutes (for 5" pies, less for smaller), until deeply golden. Let cool slightly before serving.
Makes for 10 - 12 5" hand pies
